 Creating a Setup Executable
Although you could use the setup executable you received from Stonefield Software Inc. to install Stonefield Query on your user's system, we recommend against that. For one thing, that installs Stonefield Query Studio, which your user isn't licensed to use and you almost certainly don't want your user accessing. Second, it shows the "Stonefield" name, which is a problem if you've private labeled or branded Stonefield Query. Finally, our setup won't install your customized project files, so you'd need to do that as a separate step.
Instead, we recommend creating your own setup executable. In addition to avoiding the problems mentioned above, you can customize your setup to exactly suit your needs.
Before discussing how to create a setup executable, a discussion of setup types is in order. Stonefield Query can be installed on either a single desktop computer for use as single-user software or a network server so it can be shared by several users across the network. It can also be installed in a Citrix or Windows Terminal Server environment; that works almost the same as a network server. For details on standalone versus network installations, see http://www.stonefieldquery.com/Support/FAQs.aspx.
In the case of a network server, there isn't any need to install the Stonefield Query program files (the files in Stonefield Query program directory) or your custom project files on a workstation, since they can be accessed from the workstation; you just need to install a shortcut to SFQuery.exe on the server. However, like most Windows applications, a minimal set of runtime files is required on each workstation that runs Stonefield Query. To facilitate this, a workstation-only installer, WSSetup.exe is provided. Be sure to include this file in your installer. This installer requires a file called Setup.ini in the application folder, with the following contents:
        ini


     [Setup]
AppName=Application name
EXEName=Name of Stonefield Query executable without an extension
Company=Your company name
The Generate Setup function described below automatically creates this INI file on the user's system when they install your customized version of Stonefield Query. If you are using your own installation mechanism, be sure to distribute or create this INI file.
One other thing: Stonefield Query requires the .NET 4.5 or higher framework, so if it or a higher version isn't found on the user's system, it must be installed. The installer generated from the Generate Setup function described below automatically downloads and installs the .NET 4.5 framework if necessary. If you are using your own installation mechanism, be sure to check whether .NET .5 or later is installed and if not, install it (your installer will either have to include the .NET installer or download it).
There are a couple of ways you can create a setup executable for your Stonefield Query project.
Option 1. Using the Generate Setup Function
Inno Setup is a free installer for Windows programs that's easy to use, creates small setup executables, and runs quickly. We highly recommend it; in fact, it's the installer we use to install the Stonefield Query SDK. You can download it from http://www.jrsoftware.org/isinfo.php. When installing Inno Setup, be sure to turn on the option to install the Inno Setup Pre-Processor (ISPP), which Stonefield Query requires.
The Generate Setup function in Stonefield Query Studio (available in the File and shortcut menus and in the toolbar) makes it even easier to use Inno Setup because you don't have to build the installation script yourself; this function generates a customized Inno Setup script for your Stonefield Query project. With this function, you don't have to know anything about Inno Setup; it can even generate a setup executable from the generated script file.
This function requires Inno Setup version 6.1 or later.
When you choose this function, the following dialog appears.
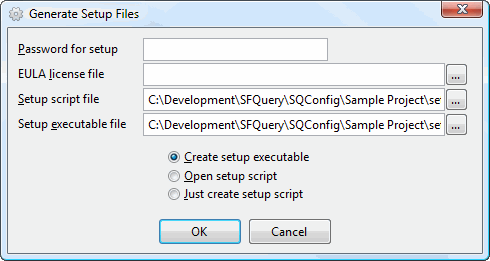
This dialog has the following options:
Password for setup: if you want your setup executable to be password protected, specify that password in this setting.
EULA license file: if you want the user to be prompted to accept an End-User License Agreement (EULA), specify the name of the file containing the text for the EULA. This file must be either a text file or a Rich Text Format (RTF) file.
Setup script file: the default name and path for the Inno Setup script file is Setup.ISS in your Stonefield Query project directory. You can specify a different file name or path if you wish.
Setup executable file: the default name and path for the setup executable generated by Inno Setup is Setup.EXE in your Stonefield Query project directory. You can specify a different file name or path if you wish.
Create setup executable: if you choose this option, the Generate Setup function generates the script file and then runs the Inno Setup compiler to generate the setup executable for you.
Because Stonefield Query Studio holds open several files listed in the Inno Setup script file, including the project files for your customized Stonefield Query project, and the Inno Setup compiler won't compile a script if any of the listed files are open in another application, Stonefield Query Studio closes during the compilation and re-opens once it's done.
Open setup script: this option generates the script file and opens it in the Inno Setup editor.
Just create setup script: choose this option if you want to generate the script file but not compile or open it at this time.
The template used to generate the script is in a file called InnoSetup.TXT in the Stonefield Query program directory. If you want to change how the Generate Setup function generates scripts, you can modify this file as you desire. For example, if you want to always use the same license agreement file, change the LicenseFile setting from "LicenseFile=" (which replaces with the EULA file you specify in the Generate Setup Files dialog) to a specific file name and path. Text between in InnoSetup.TXT are placeholders the Generate Setup function replaces with the appropriate values. Many of these are replacements for the names of certain Stonefield Query files if you've branded them. The placeholders used are:
ApplicationName: the Application Name configuration setting.
BuilderEXE: the replacement name for SQDesigner.exe.
CodeEditorEXE: the replacement name for SQCodeEditor.exe.
CommFunctionDBF: the replacement name for CommFunc.dbf.
CommFunctionFPT: the replacement name for CommFunc.fpt.
CompanyName: the Company Name configuration setting.
CompanyURL: the Company Web Site configuration setting.
ConfigCDX: the replacement name for SFConfig.cdx.
ConfigDBF: the replacement name for SFConfig.dbf.
ConfigFPT: the replacement name for SFConfig.fpt.
HaveDotNetScripts: True if any scripts use VB.NET or C#.
HelpFile: the replacement name for SFQuery.chm.
INIFile: the replacement name for SFQuery.ini.
IntelliSenseDBF: the replacement name for SQCode.dbf.
IntelliSenseEXE: the replacement name for SQCode.exe.
IntelliSenseFPT: the replacement name for SQCode.fpt.
IsFunctionsDBF: the replacement name for IsFunctions.dbf.
IsFunctionsFPT: the replacement name for IsFunctions.fpt.
LicenseFile: the EULA file specified in the Generate Setup Files dialog.
LogoImageFile: the name of the logo image file.
MetaData: a collection containing the names of the metadata files.
NewsExe: the replacement name for SQNews.exe.
OutputBaseFileName: the setup executable file name specified in the Generate Setup Files dialog.
OutputDir: the setup executable path specified in the Generate Setup Files dialog.
Password: the password specified in the Generate Setup Files dialog.
ProjectPath: the directory for your Stonefield Query project file.
QueryEXE: the name of the Stonefield Query executable file.
ReportsIconFile: the name of the icon to use for the uninstall program generated by Inno Setup.
ResourceCDX: the replacement name for SQResource.cdx.
ResourceDBF: the replacement name for SQResource.dbf.
ResourceFPT: the replacement name for SQResource.fpt.
Scripts: a collection containing the names of the script files.
SplashFile: the name of the splash screen image file.
SQPath: the Stonefield Query program directory.
UpdateEXE: the replacement name for SQUpdate.exe.
Version: the current Stonefield Query version number.
See the Inno Setup documentation for a description of the options in the script file.
If your application uses the SQProxy object, you'll need to both install it and register it. Add the following to the [Files] section:
        less


     Source: "{#SQPath}sqproxy.exe"; DestDir: {app}; Flags: ignoreversion
and add the following to the [Run] section:
        foxpro


     Filename: {app}\sqproxy.exe; Parameters: /regserver
Option 2. Using Another Installation Tool
For an installation tool other than Inno Setup, create an installer that installs the following files:
Windows System folder: should contain the following files:
LPng.dll
MSCOMCtl.ocx (this file must be registered as a COM object
MSXML4.dll (this file must be registered as a COM object)
MSXML4R.dll
TeeChart8Lang.ocx (this file must be registered as a COM object)
Common Files folder (typically C:\Program Files\Common Files\Microsoft Shared): a directory called VFP should contain:
FoxHHelp9.exe: this file must be registered as a COM object by running it with /REGSERVER specified as a parameter.
FoxHHelpPS9.dll
If any of your scripts use VB.NET or C#, the following files are also required:
VFPDotNet.dll: this must be registered using the .NET RegAsm utility using a command line similar to:
bash"C:\Windows\Microsoft.NET\Framework\v2.0.50727\Regasm.exe" "C:\Program Files\Common Files\Microsoft Shared\VFP\VFPDotNet.dll" /codebase /tlb(Although this is formatted here over several lines for readability, it should all be on one line.)
Interop.SQProxy.dll
SFQWrapper.dll
SQProxyWrapper.dll
Folder where Stonefield Query is installed:
BouncyCastle.Crypto.dll
ClrHost.dll
CommFunc.dbf and CommFunc.fpt
Compression.fll
Convert.fll
Encryption.fll
ExMAPI.fll
Feeds.css
Find.css
FoxTools.fll
Gauge.dll
GDIPlus.dll
HndLib.dll
InTry.dll
IsFunctions.dbf and IsFunctions.fpt
MailKit.dll
MIMEKit.dll
MD5.fll
MSVCR71.dll
MSVCP71.dll
Report.ico
A splash screen image file (Splash.bmp, jpg, jpeg, or png) if you want a splash screen displayed.
SQDesigner.exe
SQNews.exe
SFQuery.exe
SFQuery.exe.config
SFQWrapper.dll (only required if any of your scripts use VB.NET or C#)
SMTPLibrary.dll
SMTPLibrary2.dll
SQCode.exe, SQCode.dbf, and SQCode.fpt (there's no need to distribute SQCode2.dbf or SQCode2.fpt).
SQCodeEditor.exe
SQProxy.exe if you're using the SQProxy object; be sure to register this as a COM object.
SQUpdate.exe
System.exe
VFP9A.dll
Win7TLib.dll
WinGraphViz.dll: this file must be registered as a COM object
WSSetup.exe
WWDotNetBridge.dll
WWIPStuff.dll
XFRXLib.fll
ZLib.dll
Sample Reports folder containing any sample or standard reports you want supplied to the user.
Sample Templates folder containing any report templates you want supplied to the user.
Data subdirectory of the Stonefield Query program directory:
Unlimited.lic if you are distributing an unlimited Report Viewer license.
SQResource.dbf, SQResource.fpt, and SQResource.cdx
Folder where your Stonefield Query project files are installed (could the Data subdirectory of the Stonefield Query program directory if the user will only have a single Stonefield Query project on their system):
RepMeta.dbf, cdx, and fpt
SFScript.dbf, cdx, and fpt
SFConfig.dbf, cdx, and fpt
SFQuery.ini
SFQuery.chm (customized for your project)
Any image files specified with the Logo Image File and Icon File configuration settings
The setup must create a subdirectory of the program folder called Data and assign full permissions to all users to this folder.
You likely want the installer to create a shortcut for SFQuery.exe. Specify "INI=project file folder" as a parameter (where project file folder is the folder where the Stonefield Query project files are installed) if the project files are in a different directory than SFQuery.exe.
You should also have the installer create a Windows Registry key named HKEY_CURRENT_USER\Software\CompanyName\ApplicationName, where CompanyName and ApplicationName are the values of the Company Name and Application Name configuration settings. For example, if Company Name is "Bob Software Inc." and Application Name is "The Northwind Report Writer," create a Registry key called HKEY_CURRENT_USER\Software\Bob Software Inc.\The Northwind Report Writer. This allows the installer to remove all of Stonefield Query's Registry entries upon uninstall.
© Stonefield Software Inc., 2024 • Updated: 03/10/22
Comment or report problem with topic