 Report Bands
The Advanced Report Designer is a "band-oriented" designer. That is, objects that appear in the report appear in one of several bands. The types of bands available are:
Page Header: appears at the top of every page.
Page Footer: appears at the bottom of every page.
Detail: prints once for every record in the report.
Detail Header: prints at the start of each detail set.
Detail Footer: prints at the end of each detail set.
Group Header: prints at the start of a new group.
Group Footer: prints at the end of a new group (just before a new group is started or at the end of the report).
Column Header: prints at the start of a new column.
Column Footer: prints at the end of a new column (just before a new column is started or at the end of the report).
Title: this optional band prints at the start of the report, either on a separate page or at the top of the first page. To create a title band, choose Optional Bands from the Report menu and turn on the Report has title band option in the Report Properties dialog. To have a separate page for the title band, turn on the New page after title has printed option. To remove the title band, turn this option off; if any objects exist in the band, you are asked to confirm that these objects will be deleted if the band is removed.
Summary: this optional band prints at the end of the report, either on a separate page or after the end of the last page. To create a summary band, choose Optional Bands from the Report menu and turn on the Report has summary band option. To have a separate page for the summary band, turn on the Summary prints as new page option. The Include page header with summary and Include page footer with summary options indicate whether the page header and footer also print if the summary prints on its own page, either because Summary prints as new page is turned on or the summary band flows to a new page because there isn't enough room at the end of the last page of the report. To remove the summary band, turn this option off; if any objects exist in the band, you are asked to confirm that these objects will be deleted if the band is removed.
A report consists of, at a minimum, Page Header, Detail, and Page Footer bands. In addition, Stonefield Query creates a Summary band to hold report totals, although you can remove this band if you wish, and there is one Group Header and Group Footer band per grouped field. Bands are shown as an area in the designer window with a grey bar below it; the name of the band appears in the grey bar. For example, in the image below, the Detail band is everything between the grey bar labeled "Page Header" and the grey bar labeled "Detail."

To change the height of a band, click the band's grey bar and drag it up or down. You can also change the height in the Properties dialog for the band (discussed next). You cannot make a band smaller than the bottom of the lowest object in the band.
Properties Dialogs
Each band has its own Properties dialog where you can change certain things about the band. To access the Properties dialog, double-click the grey bar or choose Edit Bands from the Report menu, then select the band you wish to edit.
The Page Header, Page Footer, Group Footer, Column Header, Column Footer, Title, and Summary bands have similar Properties dialogs.
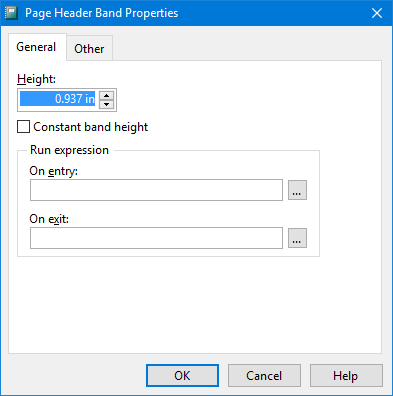
These dialogs have the following options:
Height: the height of the band.
Constant band height: turn this option on to prevent the band from growing taller as objects with the Stretch with overflow setting turned on grow taller.
On entry: an expression to execute whenever Stonefield Query starts printing this band. This is normally left blank unless you need to perform some additional processing on every pass through the band. In that case, this typically contains the name of a user-defined function.
On exit: similar to On entry, but executes when Stonefield Query is done with this band.
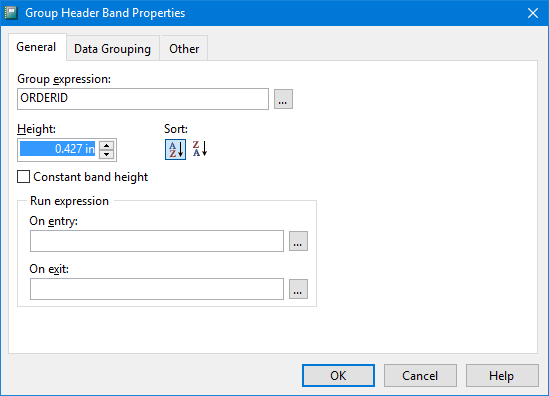
The Group Header Band Properties dialog has some additional options. On the General page, the Group expression setting specifies the expression used for the data group and the Sort setting determines if the group is sorted in ascending or descending order. The Data Grouping page has the same options as the Data Grouping page in the Report Properties dialog.
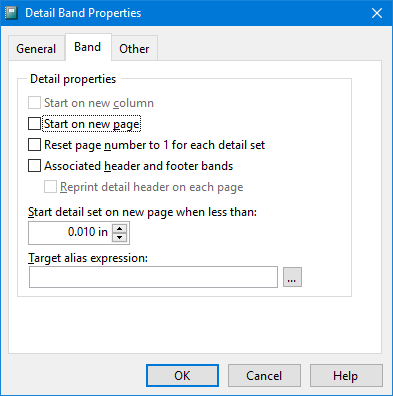
The Detail Band Properties dialog has an additional Band page with more options.
Start on new column: if this setting, which is only available if more than one column is specified in the Page Layout page of the Report Properties dialog, is turned on, every detail band starts in the next column.
Start on new page: turn this setting on to have each detail band start on its own page.
Reset page number to 1 for each detail set: turn this setting on to have page numbering restart at 1 for each detail band.
Associated header and footer bands: turn this setting on to include header and footer bands for this detail band.
Reprint detail header on each page: turn this setting on to print the detail header band again when the detail band flows onto another page. With this turned off, the detail header only prints once, at the start of the detail set.
Start detail set on new page when less than: this specifies the minimum amount of room you want at the bottom of the page before starting a new detail set. If the amount of space available is smaller than this value, the detail set starts on the next page. Setting this value to something greater than 0 prevents the case where the detail header prints at the bottom of the page without any of the detail members appearing because there isn't room.
Target alias expression: this setting determines the name of the data set (sometimes called a cursor, which is short for "current set of records") that drives this detail band. This should normally be left blank, which means the main data set created for the report is used. However, if you have more than one detail band (see the help topic for the Report Properties dialog for information on how to do that), you can specify the name of the main data set in the second or subsequent bands to tell Stonefield Query to process the current record a second time (specify "loReport.cCursor", without the quotes, in that case). You can also use an AfterData script to create another data set, and then specify the name of that data set for the target alias. Note that if you want to use an actual name, you must surround it with quotes since this value must be an expression.

All band dialogs have an Other page where you can enter a comment about the band. Click the Edit comment button to display a dialog in which you can enter the desired comment.
© Stonefield Software Inc., 2025 • Updated: 12/16/16
Comment or report problem with topic