 Field Properties (Quick Report)
The Properties dialog allows you to specify how the field looks, how grouping is performed, and whether summary totals are shown or not. You can display this dialog for the field highlighted in the Selected list in Step 2 of the Quick Report Wizard by clicking the Properties button, double-clicking the field, or selecting the field and pressing Enter.

The options in the Display page of this dialog are:
Display this field in the report: if you turn this option off (it's on by default), the field is retrieved from the database but not displayed in the report. This is useful when you want to sort on the field or include it in the query so you can link on it, but not print it.
Heading: displays the description used for the column heading. You can specify multiple lines for the heading by pressing Enter where a new line should start.
Auto-fit column: if this option is turned on, which it is by default, the column is automatically sized to accommodate the widest value in the column, including the column heading.
Width: if the Auto-fit column option is turned off, this is used as the width for the field in the report. The default is the larger of the field width and the width of the column heading. This value can be reduced to fit more columns on the page; the field contents and column heading either automatically wrap within the reduced width as necessary or are cut off if the contents are too wide for the reduced width, depending on the setting of the If the width is too narrow option (discussed next).
If the width is too narrow: this setting determines whether the contents of a field that are wider than the setting of the Width option automatically wrap within the column width (the default) or are cut off. There are two choices for the latter: you can specify that an ellipsis appears at the end of the text (for example, "Bob Jones Country Store" may appear as "Bob Jones...") or in the middle of the text (for example, "Bob Jones Country Store" may appear as "Bob...Store"), making it obvious that some data isn't displayed.
Suppress repeating values: if this option is turned on and several records in a row have the same value in this field, only the first occurrence is printed; the field in subsequent records appears blank.
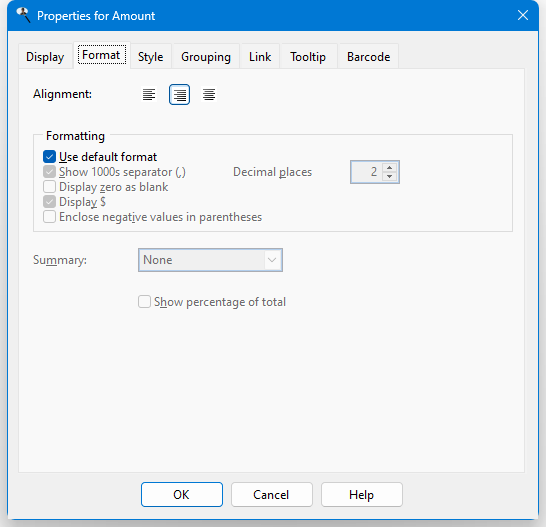
The Format page of this dialog is only available if the Display this field in the report option is turned on. The options in this page are:
Alignment: text alignment options for field headings and field contents. By default, numeric fields are right-aligned and all others are left-aligned.
Use default format: if this option is turned on, which it is by default, Stonefield Query uses the defined format for the field. If the format for the field changes in the future, the report uses the new format automatically. If you wish to change any of the formatting options, turn this setting off. This option is only available for numeric and date/time fields.
Show 1000s separator: if this option is turned on, the data in the field is formatted with the thousands separator defined in the Regional Settings applet of the Windows Control Panel. This option is only available for numeric fields or if Summary is set to Count or Count Distinct.
Display zero as blank: if you turn this option on, a blank is displayed rather than a zero value. This option is only available for numeric fields or if Summary is set to Count or Count Distinct.
Display $ (the appropriate currency symbol for your system is displayed in place of "$"): turning this option on displays the currency symbol defined in the Regional Settings applet of the Windows Control Panel in front of the field's value. This option is only available for numeric fields and only if Summary is not set to Count or Count Distinct.
Enclose negative values in parentheses: turn this option on to display negative numbers in parentheses rather than with a minus sign; for example, (123.45) instead of -123.45. This option is only available for numeric values and only if Summary is not set to Count or Count Distinct.
Display empty date as blank: if this option is turned on, a blank is displayed rather than " / / " for blank dates. This option is only available for date/time fields.
Display date only: turning this option on displays only the date portion of the field's value. This option is only available for date/time fields.
Display date as: this option allows you to specify how dates are displayed: as the date; the hour, day, month, month and year (with either the full month name or as a three-letter abbreviation, such as "Jan" for "January"), or year part of the date; or as the week (for example, "Week of 01/10/2010" for a date of 01/14/2010), quarter (for example, "Quarter 1" for a date of 01/14/2010), or fiscal year (for example, "2011" for a date of 12/06/2010 if the Year Starts In setting in the Options dialog is set to November) the date falls in. This option is only available if Summary is set to "None."
If you choose "Week," the Week starts on setting in the Options dialog determines which day a week starts on. If you choose "Quarter" or "Fiscal Year," the Year starts in setting determines which quarter number or year a date falls in.
Decimal places: the number of decimals to display for numeric fields. This option is disabled if Summary is set to Count or Count Distinct.
Summary: this option allows you to specify whether a total ("sum"), average, highest, lowest, count, or count distinct value appears for this field at the end of groups and at the end of the report. Sum and Average are only available for numeric fields. This option is only available for date fields if the Display date as option is set to "Date," and it's unavailable if the field is grouped or the Include this field in the group header for option in the Grouping page is turned on.
The difference between Count and Count Distinct is that Count counts the number of records while Count Distinct counts the number of records having unique values on this field. For example, if there are 100 order records but all orders were placed this week, using Count on the Order Date field would display 100 but Count Distinct would display 7 (assuming at least one order was placed every day this week). Note that only one field in a report can use Count Distinct.
If the field is a formula that has the Calculate value at group level setting turned on, an additional choice is available: Group Calculation. That tells the report to calculate the summary value by applying the formula's expression to the sums of the fields that make up the expression. See the Creating Your Own Formulas topic for more information.
Choose the desired function from the drop-down list, or "None" for no summary value.
If you choose Sum and Auto-Fit column is turned off, the field width is not automatically adjusted. As a result, you may find that the totals for a field are wider than can be displayed (the totals appear as a set of asterisks: *******). You should increase the width of the field to account for totals.
Show percentage of total: turn this option on to show the percentage that each value is of the total at each group break, and at each group break, the percentage that the group total is of the grand total. This option is only available when Summary is set to Sum, Count, or Count Distinct.
If you set Summary to Count or Count Distinct on a non-numeric field and turn on Show percentage of total, you also have to turn on the Summary report setting in Step 5 or you will receive a warning when you try to run the report that it won't work.
Display as: if the field contains HTML or rich text (RTF) formatted content and you want that content displayed as formatted text, choose "Formatted HTML" or "Formatted Rich Text" rather than the default "Text". Note that choosing the wrong setting will likely result in gibberish appearing for the field. Also note that the formatting may not be perfect due to the differences between how HTML or RTF are rendered in a form versus a report. This option is only available for memo fields.

The Style page of this dialog is only available if the Display this field in the report option is turned on. The options in this page are:
Use default font: if this option is turned on, which it is by default, this field uses the default font specified in the template for the report, even if the default font is changed after the field is added to the report. To change the font, turn this option off.
Font: the font name, size, and style to use for this field. To change any of these, click the font selection button (which appears as "...") and select the desired font name, size, and style from the Font dialog that appears. Note that if you select a font script other than Western, the script name (such as "Greek") appears after the font name, size, and style.
Use dynamic expression for font style: if you want the font name, size, or style of the field to change depending on the contents of this or some other field, turn this setting on and click the button with the ellipsis ("..."). The following dialog appears:
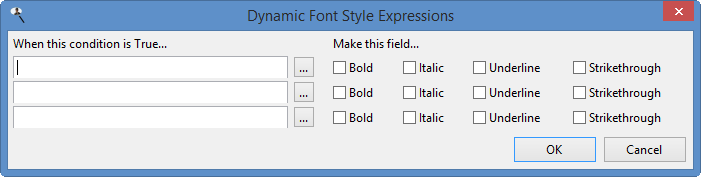
In this dialog, enter the expression you wish to look for (you can click the Expression Builder button to launch the Expression Builder, which makes it easier to enter the expression) and the font style to use when that expression is true. You can use "{VALUE}" as a placeholder for the value of the current field being output rather than specifying the field name. You can enter up to three expressions to change the font style. If none of the expressions is true, the font style specified for the field is used.
Using this option significantly increases report generation time, so use it only when required.
The expression is evaluated against the result set, which means that you may have to account for formatted values. For example, formatting a date field to display as Month/Year causes that field to contain values such as "January 2021," which is a string rather than a date, in the result set. That means an expression like "YEAR({VALUE})" is invalid because the YEAR() function requires a date parameter.
If your dynamic expression is invalid, you won't get an error; it'll simply be ignored.
Use default color: if this option is turned on, which it is by default, this field uses the default color specified in the template for the report, even if the default color is changed after the field is added to the report. To change the color, turn this option off.
Fore color: the foreground, or text, color for the contents of the field. The default color is the color used in the template for the report; to change it, click this button and select the color from the Color dialog that appears. The sample text show what the field looks like in the report.
Back color: the background color for the field. The default color is the color used in the template for the report; to change it, click this button and select the color from the Color dialog that appears. The sample text show what the field looks like in the report.
Use dynamic expression for color: if you want the color of the field to change depending on the contents of this or some other field, turn this setting on and click the button with the ellipsis. The following dialog appears:
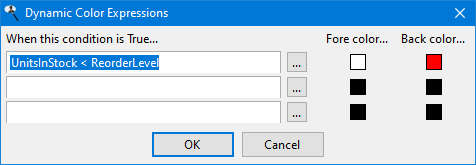
In this dialog, enter the expression you wish to look for (you can click the Expression Builder button to launch the Expression Builder, which makes it easier to enter the expression) and the foreground (text) and background colors to use when that expression is true. For example, in the image above, when UnitsInStock is less than ReorderLevel (in other words, we need to reorder this product), the field appears in white text on a red background. You can use "{VALUE}" as a placeholder for the value of the current field being output rather than specifying the field name. You can enter up to three expressions to change the color. If none of the expressions is true, the color specified for the field is used.
Using this option significantly increases report generation time, so use it only when required.
The expression is evaluated against the result set, which means that you may have to account for formatted values. For example, formatting a date field to display as Month/Year causes that field to contain values such as "January 2021," which is a string rather than a date, in the result set. That means an expression like "YEAR({VALUE})" is invalid because the YEAR() function requires a date parameter.
If your dynamic expression is invalid, you won't get an error; it'll simply be ignored.
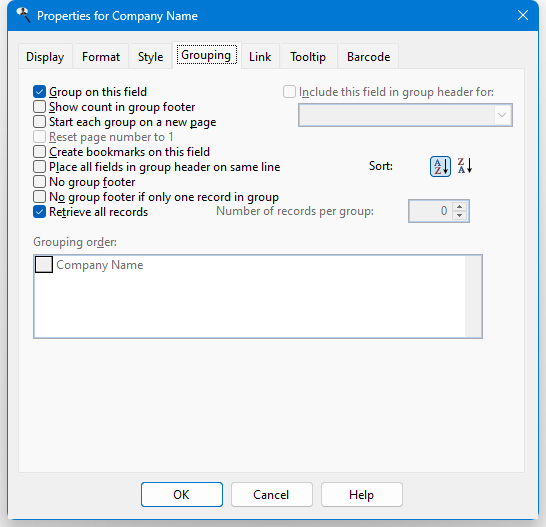
The Grouping page of this dialog allows you to group on the selected field and specify some options about how grouping works. Most of these options are disabled unless you turn on the first one, Group on this field.
The options in this page are:
Group on this field: turn this option on to add this field to the Grouping order list, or turn it off to remove the field. If you group on a field, the report is automatically sorted on that field, and the setting of the Sort option determines how it is sorted.
Show count in group footer: if this option is turned on, a count of the number of records in the group appears at the end of the group in the report.
Start each group on a new page: if this option is turned on, Stonefield Query performs a page break when the group changes.
Reset page number to 1: turn this option on to start page numbering from 1 again when the group changes. Turn it off to continue page numbering from the previous page. This option is only available if Start each group on a new page is turned on.
Create bookmarks on this field: if this option is turned on, the different values of this field are displayed in a table of contents when the report is previewed or output to PDF or HTML. You can jump to the appropriate place in the report by clicking an item in the table of contents. This option is available both for grouped fields and fields included in the group header of another field.
Place all fields in group header on the same line: with this option turned off, each field in the group header appears on its own line with the field values left-aligned with each other. This can make the group heading fairly tall, so turn this option on to place all fields in the group header on the same line (although if there are a lot of fields, they may wrap to another line).
No group footer: if this option is turned on, the report has no group footer for this field.
No group footer if only one record in group: even if there's only one record in a group, Stonefield Query normally displays a group footer. This takes up extra space and displays as a total the same value as the detail line, which can seem redundant. Turn this option on to suppress a group footer for any groups that consist of a single record. This option is ignored if the Show totals in group headers option in Step 5 is turned on and is disabled if Show count in group footer is turned on since a group footer is always output in that case.
Retrieve all records: by default, Stonefield Query retrieves all records that belong to a group. However, you can limit the number of records per group by turning this setting off and setting Number of records per group to the desired value. You can combine this with sorting on one of the fields in the detail for the group to see the oldest or newest record. For example, suppose you want to see only the most recent activity for a customer. To do that, group on customer name, set Number of records per group to 1, and sort on the activity date in descending order.
Include this field in the group header for: this option allows you to include non-grouped fields in the group header for a grouped field. For example, suppose you group on City from the Customers table but want to show the Region in the group header as well. Turn this option on and select City from the drop-down list to place both City and Region in the group header. All fields that appear in group headers appear in a summary report.
Sort: click the Ascending button to sort this field from lowest to highest, or the Descending button to sort from highest to lowest.
Grouping order: fields in this list may be moved up and down to change the order in which the data is grouped. To do this, click the button in front of the desired field and drag the button up or down in the list. This is only available if there is more than one field in the list.

The Link page allows you to link the selected field to an email dialog, a Web site, or a report. A linked field appears underlined in the report Preview window, similar to a hyperlink in a Web browser, in either blue (for email and Web site links) or green (for report links). When you click a linked field in the Preview window, one of several things happens:
For email links, the New Message dialog for your email program is brought up with the email address already filled in.
For Web site links, your Web browser opens and navigates to the Web site.
For report links, the specified report is run and displayed in either another tab in the Preview window or its own Preview window, depending on the setting of the Preview reports in tabbed pages option in the Options dialog. This acts like drilling down from one report to another.
Most of the options on this page are disabled unless you set Link Type to something either than None, and the page itself is only available if the Display this field in the report option is turned on. The options are:
Link Type: choose the desired link type.
Field containing email address: this option, which only appears if Link Type is set to Email, specifies which field contains the email address to link to. By default, it's the same as the field the properties dialog is working on, but if, for example, you wish to click on the company name to bring up the New Message dialog with the proper email address filled in, select the field that contains the email address to link to. Only fields selected for the report appear in the list of fields, so be sure to include the desired field in the report. If you don't want that field to actually appear in the report, turn off the Display this field in the report setting for that field.
Field containing URL: this option, which only appears if Link Type is set to Web site, specifies which field contains the URL, or Web site address, to link to. By default, it's the same as the field the properties dialog is working on, but if, for example, you wish to click on the company name to bring up the Web site for that company, select the field that contains the URL to link to. Only fields selected for the report appear in the list of fields, so be sure to include the desired field in the report. If you don't want that field to actually appear in the report, turn off the Display this field in the report setting on the Display page for that field.
Report to run: this option, which only appears if Link Type is set to Report, specifies which report to run when you click the field in the Preview window. Click the down arrow and select the report from the list; you have to expand the folder the desired report is in to select the report. When you've found the desired report, double-click it or select it and click the down arrow to close the report selector.
Values to pass: this option, which is only available if Link Type is set to Report, allows you to pass values to the ask-at-runtime filter conditions of the linked report. Without this option, when you click a field linked to another report, that report prompts you for any of its ask-at-runtime filter conditions, which may not make sense. For example, suppose you have a customer report and you've linked the company name field to a report showing sales by customer. The linked report has an ask-at-runtime filter condition on the customer number, so when you click a particular company name, the linked report runs and asks you for the customer number. That seems odd, because you just clicked a particular customer and now it wants you to specify which customer. To make this more seamless, you want to tell the linked report which customer you just clicked. You do that by specifying what value to pass to the ask-at-runtime filter condition of the linked report. In this case, you'd specify that the customer number should be passed to the linked report. Since that value is passed, the report doesn't need to ask you for the customer number, and simply displays the sales for the customer you clicked.
The list shows each of the ask-at-runtime conditions for the linked report. The first column shows the field used in the ask-at-runtime condition, the second column allows you to specify the type of value to pass to the report, and the third column specifies the value to pass. The choices for the Type of Value column are:
None, which means a value won't be passed to this condition, so you are still prompted for its value.
Filter Condition, which means this report contains the same ask-at-runtime filter condition as the linked report, and you want the value you specify when you run this report passed to the linked report. For example, if both reports have an ask-at-runtime filter condition on the order date, you'd want to use the same order date range you specify when you run this report used for the linked report. So, choose Filter Condition and select the field used for the condition in the Value to Pass column.
Field, which means you want to pass the value of the field specified in the Value to Pass column for the current record. For example, when you click the company name, you want to pass the customer number to the ask-at-runtime filter condition on customer number to the linked report, so choose Field and select the Customer Number field in the Value to Pass column.
Ignore this condition, which means you want to ignore this condition (that is, act like you clicked the Ignore this condition option in the filter value dialog) and not display the dialog asking you for the value for this condition.
Only fields selected for the report appear in the list of fields in the Value to Pass column, so be sure to include the desired field in the report. If you don't want that field to actually appear in the report, turn off the Display this field in the report setting for that field.
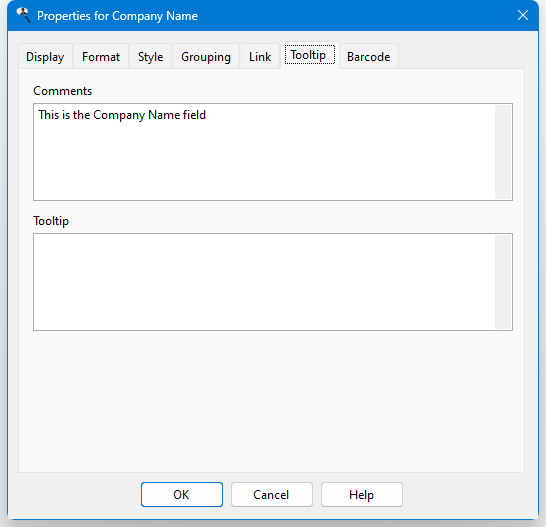
The Tooltip page shows any comments about the field, which is often used to provide a description of the field's contents, and allows you to enter a tooltip for the field. The tooltip appears when you hover the mouse pointer over a value for that field in the Preview window, in a PDF file, and in a HTML file. To use an expression for the tooltip, surround it with curly braces. For example, if you have a report showing Customer Name and City, and the report also has Country but with Display this field in the report turned off, using an expression of:
{Country}
displays the country name when you hover over a city.
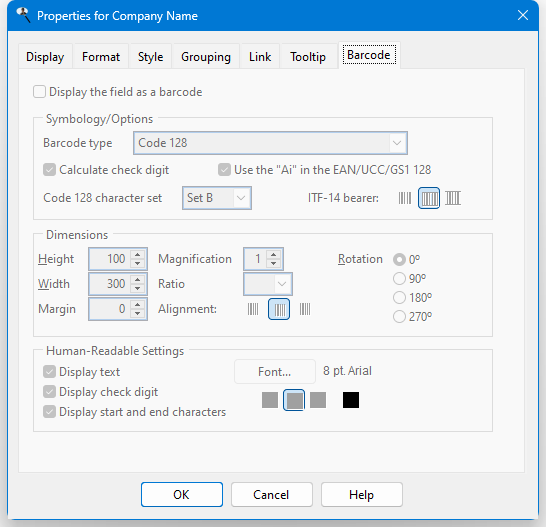
Turn on Display the field as a barcode on the Barcode page (this option is only available for character or numeric fields that aren't being grouped on) to display a barcode for the field. There are many options available to control the way the barcode appears.
Barcode type: choose the desired barcode type from the available types in the list. The type you choose determines which other options are available.
Calculate check digit: turn this option on to calculate the check digit. It's only available for Code 39, Code 39 Extended, Standard 2 of 5, Interleaved 2 of 5, and Code 11 barcodes.
Use the "Ai" in the EAN/UCC/GS1 128: turn this option on to use GS1/UCC/EAN-128 Application Identifiers. It's only available for EAN/UCC/GS1-128 barcodes.
Code 128 character set: this option determines the set used for Code 128 barcodes: "A," "B," "C," or AUTO.
ITF-14 bearer: this option specifies the supporting frame type used for ITF-14 barcodes: None, Rectangle, or Top & Bottom.
Height and Width: the dimensions of the barcode in pixels.
Margin: the margin around the barcode in pixels.
Magnification: the magnification factor of the bar code: 1 to 9.
Ratio: this option specifies the relationship between narrow and wide bars. It's only available for Code 39, Code 39 Extended, Standard 2 of 5, Interleaved 2 of 5, ITF-14, MSI/Plessey, and Telepen barcodes.
Alignment: this option determines whether the barcode is aligned on the left, center, or right of the image.
Rotation: this option specifies the rotation of the barcode image.
Display text: turn this option on to display the human-readable text of the field in the barcode image.
Display check digit: turn this option on to display the check digit. It's only available for Code 39, Code 39 Extended, Code 93, Code 93 Extended, Standard 2 of 5, Interleaved 2 of 5, and Code 11 barcodes.
Display start and end characters: turn this option on to include the start and end characters as human-readable text. It's only available for Code 39, Code 39 Extended, and Codabar barcodes
Font: click this button to choose the font and size for the human-readable text.
Alignment: specifies how the human-readable text is aligned: left, center, or right.
Color: click this button to choose the color for the human-readable text.
© Stonefield Software Inc., 2025 • Updated: 05/19/21
Comment or report problem with topic