 Application Views
Application views only available in the Ultimate version of Studio.
Descriptive names make it much easier for the user to select which tables and fields they want to include in a report in Stonefield Query than having to choose from the sometimes-cryptic real names. Even so, it can be overwhelming to choose the correct tables and fields from a large data dictionary. For example, Sage 300 ERP, an accounting system from Sage, has over 45,000 fields in over 1,300 tables. Although data groups help logically segregate the tables and reduce the number that appear at one time, a user reporting on the Accounts Receivable module still has to select from 107 tables and 190 fields in the Customers table alone. It can be intimidating when presented with such long lists of tables and fields to find the one containing the data you require for a report.
The heart of the issue is that even with descriptive names, Stonefield Query is still displaying a database-centric view of the data. Unfortunately, many users don't think of the application in terms of how the data is stored. Rather, they see the application as being organized around its data entry screens.
You can organize the Stonefield Query data dictionary to more closely resemble that of the screens in the application. We call these "application views," because they provide an application-centric view of the data.
If you have defined application views for your project, Step 2 of the Stonefield Query report wizards provides an option to display in either application view or database view. Database View is useful for those familiar with the structure of the application's database while Application View is better suited to those familiar with the user interface of the application.
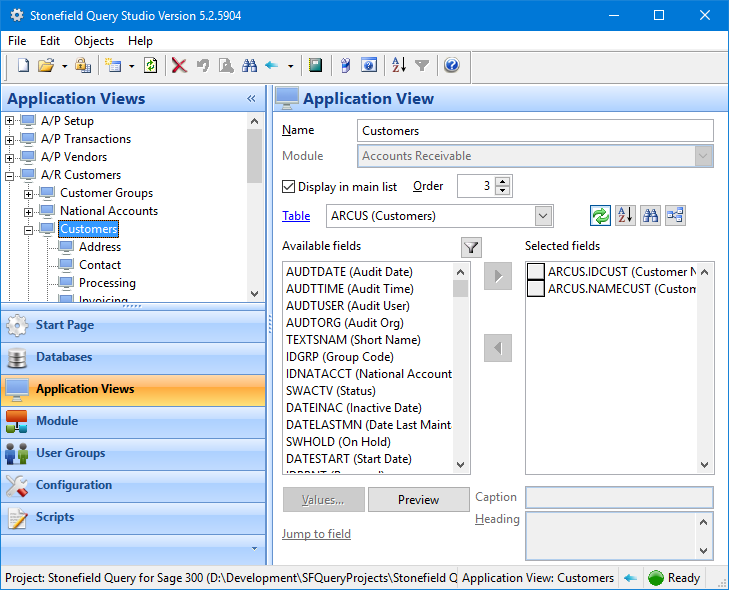
The following image shows Stonefield Query for Sage 300 ERP in Application View:

The View drop-down shows a list of views which is identical to the list of Accounts Receivable data entry screens. The Customers view has two fields, Customer Number and Customer Name, and a set of subviews: Address, Contact, Processing, and so forth. Each of the subviews has a list of fields, not all of which are from the Customers table, and possibly additional subviews, which in turn have their own set of fields.
Now look at the Customers screen in Sage 300 ERP:

Notice it has two fields, Customer Number and Customer Name, and a set of tabs: Address, Contact, Processing, and so forth. Each of the tabs has its own set of fields, not all of which display data from the Customers table. In other words, Application View in Stonefield Query for Sage 300 ERP has the same organization as the data entry screens in Sage 300 ERP. As a result, it's now very easy for the user to find the fields they want to include in a report: if they know where those fields are in Sage 300 ERP, they know where they are in Stonefield Query because the organization is identical.
There are two types of application views: those that appear in the View drop-down in Step 2 of the report wizards and those that appear in the fields list for a specific view (in other words, a subview). This is controlled by the setting of the Display in main list property for an application view. An application view can have subviews; a subview is defined as a child of a higher-level views. You can have as many levels of views and subviews as you wish.
To create an application view, select the Application Views panel and click the Create button ( ) in the toolbar. If no application view is selected in the TreeView, a top-level application view is created; otherwise, the application view is created as a subview of the selected one. Alternatively, you can click the drop-down arrow beside the Create button and from the menu choose Create Application View (child) to create a subview of the selected application view or Create Application View (top-level) to create a top-level application view. Those two functions are also available in the Objects and shortcut menus.
The options in the properties pane for an application view are:
Name: the name of the application view as the user sees it. Application view names don't have to be unique because internally they're stored with a unique ID; however, having duplicate names at the same level can be confusing to the user. You also don't have to worry about delimiters for names containing spaces or other characters. You are not allowed to leave the name blank.
Data group: the data group the application view belongs to. You can only set this for top-level application views; subviews fall under the parent application view so they belong to the same data group.
This item may not appear as "Data Group"; the Description for data groups configuration setting determines what text is displayed.
Display in main list: turn this option on if the application view should appear in the View drop-down in Step 2 of the report wizards; this is automatically turned on for top-level views and can't be turned off, but you can also turn it on for subviews.
Order: the numerical order of the application view within its parent. This allows you to organize application views so they appear in the same order as they do in, for example, a menu in the application your Stonefield Query project reports on. You can also reorder application views by dragging them in the TreeView as discussed below.
Table: select the table from which you want to choose fields to add to the application view. Notice that this appears as a hyperlink, so you can click "Table" to jump to the selected table in the Database panel. This is convenient when you want to check something about that table, and then click the Back button in the status bar to return to the application view.
Available fields: displays a list of the fields in the selected table that aren't already in the application view.
Selected fields: displays the list of fields in the application view.
 : click this button to toggle between displaying real names (for example, "ARCUST.IDCUST (Customer Number)") or captions first ("Customer Number (ARCUST.IDCUST)").
 : click this button to toggle how fields are sorted: in alphabetical order or database order.
 : a long list of tables can make it difficult to find the ones you're interested in. Once you've selected fields from one table, chances are you're next going to select fields from a directly-related table. For example, if you chose a field from Customers, you are more likely to choose a field from Orders than from Products. Click this button to reduce the list of tables to only those directly related to ones you've already selected fields from. Click it again to restore the list to all tables.
 : click this button to display a dialog prompting you to enter a string. Only fields containing that string in the caption or field name are then displayed. This makes it easier to find a particular field when there are lots of choose from. Click the button again to turn off the filter.
Values: displays a list of the unique values in the field selected in either the Available or Selected list, depending on which one was selected last. This is handy if you're not sure what data a field contains.
Preview: click this button to display a dialog that shows what Step 2 of the report wizards will look like.
Jump to field: click this link to jump to the field selected in either the Available or Selected list, depending on which one was selected last. Like the Table link, this is a handy way to check something about the field and then return back to the application view.
Caption: the caption for the selected field in the Selected list. This defaults to the caption defined for the field in the data dictionary but since a particular field might appear with different captions in different screens (for example, "Customer Number" in one and "Customer No." in another), this allows you to exactly match the caption in the application view with that of the appropriate screen.
Heading: the default column heading for the selected field in the Selected list. As with Caption, you can use a different heading for the same field in different application views.
In addition to changing Order, you can also rearrange application views by dragging them in the TreeView. What happens when you drag an application view and drop it on another one depends on what application view you selected and which one you dropped it on:
Dropping a child application view onto its parent causes the child to move to the same level as the parent (in other words, they are now siblings, children of the same parent).
Dropping an application view onto a sibling displays a menu with the following choices:
Move above this one: moves the dragged application view above the selected one. This has the same effect as changing Order for the dragged application view to that of the selected one, which moves the dragged one to the spot occupied by the selected one and the selected one to move down one spot.
Move below this one: moves the dragged application view below the selected one. This has the same effect as changing Order for the dragged application view to one more than that of the selected one.
Make a child of this one: makes the dragged application view a child of the selected one.
Cancel: cancels the drag operation.
Dropping an application view onto an unrelated application view displays a menu with the following choices:
Move to the same level this one: moves the dragged application view to the same level as the selected one. If the selected application view is a subview, the dragged one is now a child of the selected application view's parent. If the selected application view is a top-level view, so is the dragged one.
Make a child of this one: makes the dragged application view a child of the selected one.
Cancel: cancels the drag operation.
© Stonefield Software Inc., 2025 • Updated: 06/01/18
Comment or report problem with topic